If you’ve worked with *Genesis child themes, especially from *StudioPress, then you are familiar with the Genesis eNews Extended plugin. I’m also betting many of you use MailChimp to handle your website subscribers. In this tutorial, I will show you how to use MailChimp merge tags with the Genesis eNews Extended widget’s hidden field section to track and segment subscribers. Using the free version of MailChimp? No worries, merge tags are available in the free version so let’s get crackin’!
So, what are merge tags? MailChimp defines these as:
A unique, text-based identifier that corresponds to the data in a list field.
I would add, in my opinion merge tags are hidden bits of meta data that can help you organize your subscribers, and even your website traffic. How? Glad you asked!
- Track the source: If you use the eNews Extended widget in multiple locations in your website, wouldn’t you like to know the page or location that convinced your new subscriber to sign up? And conversely, which ones are ignored?
- Multiple sidebars: You smartly use the Genesis Simple Sidebars or similar plugin to put different sidebar content on different pages to better match your audience’s interest. What if these contained a CTA for a free download or an email learning series? A merge tag saved as a list field would allow you to identify the offer selected for fulfillment.
Creating Merge Tags in MailChimp
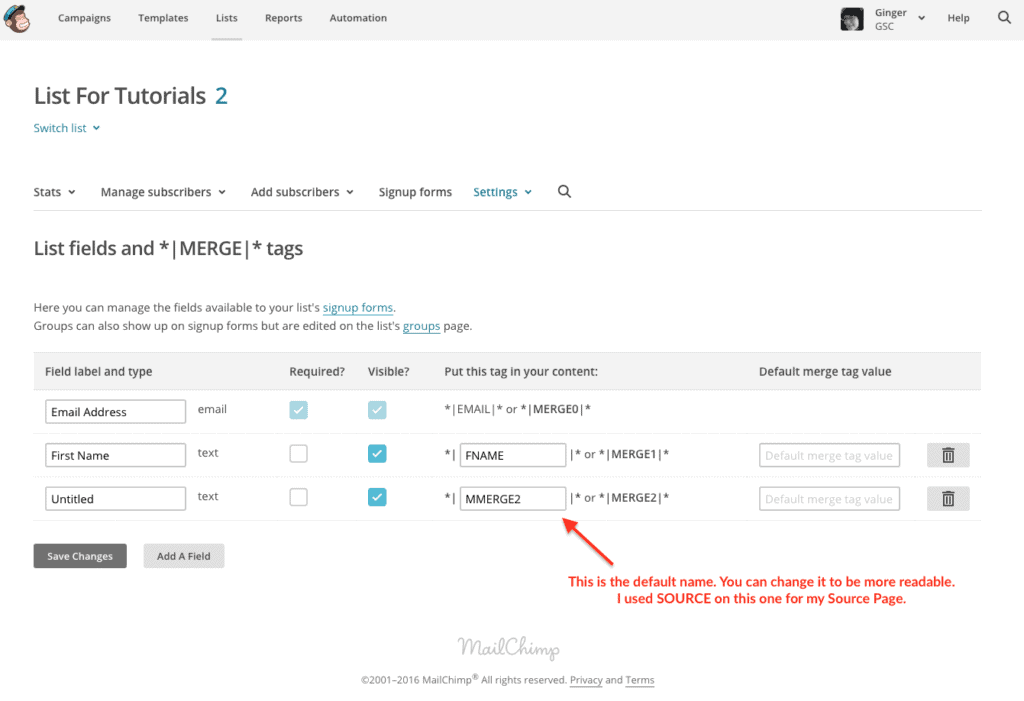
Log in to your MailChimp account and go to your list that you’d like to work with. Click Settings -> List fields and *|MERGE|* tags. Next, click on the Add A Field button at the bottom, and you’ll be presented with a list of field types to choose from:
You want to be sure and click on the Text option, then Save Changes. Regarding other field types, since these fields will be hidden, there is no need to select a specific data type since formatting and data validation won’t apply. After clicking on Text, your screen should look like this:
Next:
- Put in a description for your new field where it initially says “Untitled”.
- Uncheck the blue Visible box since these are hidden fields.
- I would suggest renaming the tag value to something more memorable where it shows
MMERGE2on the screen shot. It will let you enter up to 10 characters and will strip out any non-alpha characters or spaces as you type.
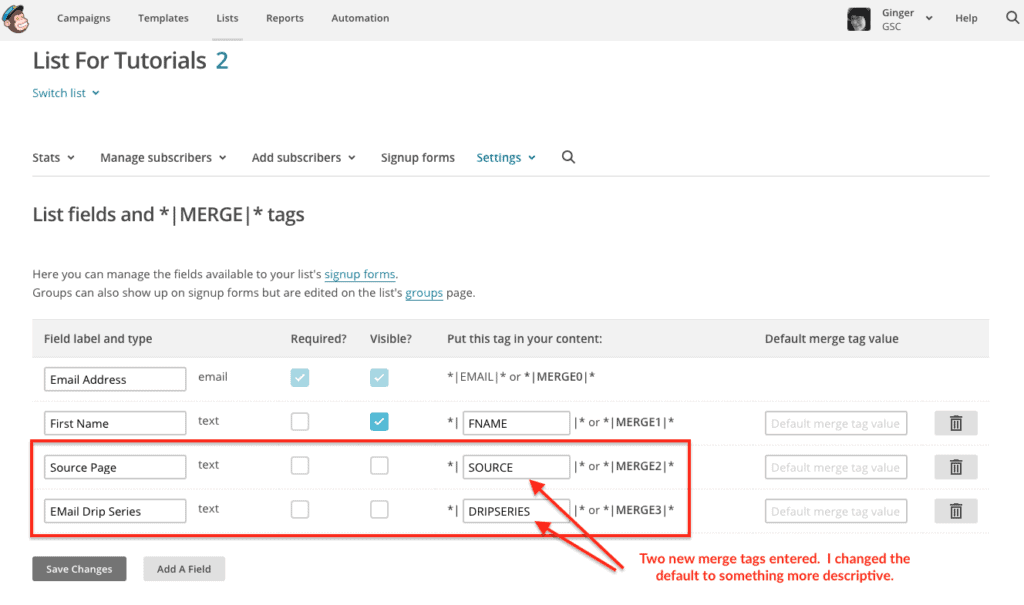
I chose to use SOURCE for one field and DRIPSERIES for the other:
Finally, click to view this subscriber list. Notice you now have new columns, one for each of the merge tags you’ve entered:
Adding the Merge Tags to the Genesis eNews Extended Widget
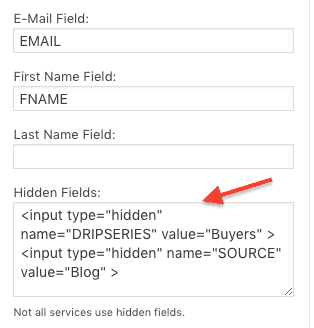
Now it’s time to put your new tags to use! Go to your WordPress Dashboard and locate the first Genesis eNews Extended widget you want to add a field to. Use this format exactly, only changing what I have in the name and value fields to match your data.
<input type="hidden" name="MYNAME" value="MYVALUE">
If you recall my screen shot, I named one of my merge tags “SOURCE”, and in this example I used the value of “BLOG” — I wanted to know how many people subscribed using the widget from my blog page:
<input type="hidden" name="SOURCE" value="Blog">
You want to place this HTML in the Hidden Fields box on your widget. You can use more than one merge tag field at a time if you like — in my example I’ve used two:
Click save on your widget changes. Now test it out:
- Go to the location on your site for this widget.
- Subscribe with a test email that you have access to.
- Confirm the list subscription when the email is received.
Now comes the fun part, let’s head on back to view your subscriber list in MailChimp to see the results:
You can see on my screen shot I have a new subscriber at the bottom with values populated for both my Source Page and Email Drip Series merge tag fields. Those values tell me where the person signed up and that they are interested in receiving an email series from me.
That’s all there is to it, pretty cool, huh?
*There are affiliate links sprinkled throughout this post.


I just tried this and it doesn’t appear to work for some reason
Happy to offer some tips if you have more details on how it didn’t work?
Hi
Just tried this also. When I sign up it took me to the mailchimp signup screen and said “There are errors below” …when I click Sign up to list it then will sign up, but the hidden field value has not been populated
Hi Ed,
I would take out the content in the hidden fields area and make sure your Genesis eNews widget is working correctly without them. If that is successful then I would double-check the syntax of the hidden fields compared to the screenshot I have and go from there.
Hi for some reason it does not work for me. I have tested by adding my own email address and it takes me to another page to say ‘Almost finished, we just need to confirm your email ..
but nothing received. Any ideas why? i’ve tried everything.
Hi Sophia,
What you describe is normal behavior……MailChimp will show you that “Almost finished ” page while it’s sending the email confirmation to the recipient (double opt-in). I would try another email address you have access to for your testing. If you’d like more information regarding connecting the Genesis eNews Extended plugin with MailChimp, have a look a this support link here: Genesis eNews Extended with MailChimp
Hi Ginger,
Thanks a lot for this post! It’s very useful indeed.
By the same token, does the Genesis eNews Extended widget (its Hidden Fields) work with the Tags (NOT merge tags) created in Mailchimp without creating any merge tags?
Thanks!
Glad it was helpful! Regarding the hidden fields and tags in MailChimp, I’m not aware of the ability to work with them directly, but that might be a good question for the eNews Extended developer to verify.